Hello again! I have been busy, busy, busy! Where did December go? I can tell you that I have been spending a LOT of time in my kitchen, but didn’t have much time to take photos of, or share with my words, all the things I was doing. So, now I get to play catch up! First things first – In addition to my day job, I had an opportunity to work as a seasonal bookseller at a local bookstore, so I invested some of my earnings and employee discount in some new cookbooks. I will share those very soon. They asked me to stay on and cover some shifts through the end of January, and I said yes. I am not going to lie – I am exhausted, but the extra cash is very helpful.
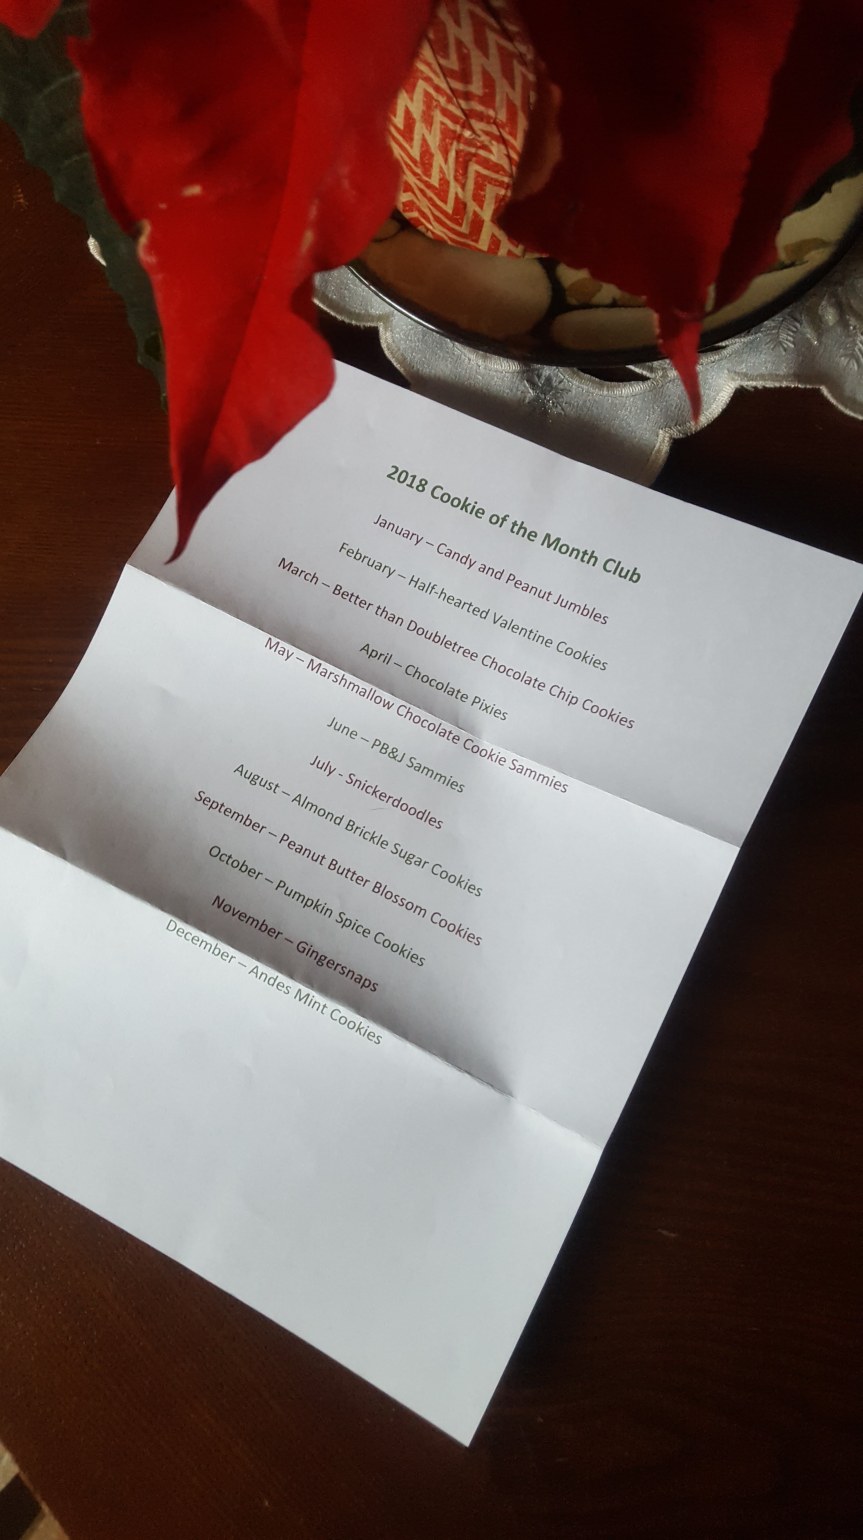
Now that it is January, I can also share the gift I gave my hubby for Christmas! I enrolled him in the “Cookie of the Month Club!” I did this for him two years ago, and he loved it because he loves having cookies and milk for dessert. This is something I made up. Basically, I bake him a batch of cookies each month. I make a pretty (and simple) schedule of what he will get each month, put the schedule in a cute envelope and put it under the tree. He was very happy to get it again this year after being without it last year.
The logistics side of it meant that I printed a copy of the schedule for myself and copied all the recipes that I am using from their respective books, labeled each copy with the month, and put them in a folder so that I don’t have to hunt each recipe down every month. Easy peasy!
I have been experimenting a LOT with gluten-free baking lately. A family member of mine can no longer have wheat, so I took it as a personal challenge to make sure that they never want for baked goods. This means I have been diving into various cookbooks and buying gluten-free boxed mixes by the cart load to see what works and what doesn’t.
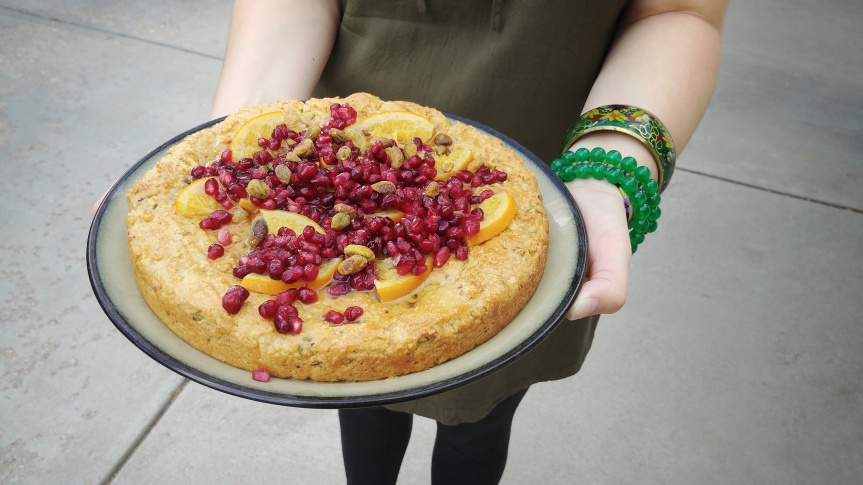
One recipe that I am LOVING as a gluten-free cake (that has worked for me every time), and is very versatile, is a recipe for Pistachio Olive Oil Cake from my Pure Vegan cookbook by Joseph Shuldiner. I even doubled the recipe for two cakes this last time, and it turned out wonderfully.
This Pistachio Olive Oil Cake can be flavor-adjusted for each season.
Here’s how to put this cake together.
Ingredients for the cake:
1/3 cup extra-virgin olive oil, plus some to grease the pan (I use spray oil to grease the pan)
2/3 cup shelled pistachios – toasted (This is one place where the flavors can be adjusted. I used walnuts for a fall flavor.)
1/2 cup plain, unsweetened soy yogurt (I have actually used regular greek yogurt… it’s not vegan, but it works.)
6 ounces soft silken tofu (It is important to be the soft kind. Firm tofu gets chunky.)
3/4 cup sugar
1 teaspoon pure vanilla extract (My favorite is Penzeys Spices Double-Strength)
1 cup all-purpose flour (I use Cup4Cup gluten-free multipurpose flour blend.)
1/2 teaspoon baking powder
1/2 teaspoon baking soda
1/4 teaspoon salt
Preheat the oven to 325°F and prepare a 9-inch baking pan by cutting a piece of parchment paper to fit the bottom and spraying the pan and parchment with olive oil. (The parchment is key as I use the bottom of the cake as the top once it is turned out.)
Finely grind the pistachios in a food processor (but do not let it turn to pistachio butter). Set this aside for a few minutes.
Mix the olive oil, yogurt, tofu, sugar, and vanilla using the cake paddle of your electric stand mixer. (If you do not have a stand mixer, I highly recommend getting one – it will make your baking life SO much better.)
Sift together the flour, baking powder, baking soda, and salt. Pour by the large spoonful into the wet mixture, with the mixer on slow speed. After the flour blend is all incorporated, pour in the pistachios and mix until just incorporated.
That’s it for the cake batter! Pour it into your prepared pan and whack that dish in the oven on the center rack. I usually need to bake this for about 35 minutes. Maybe that is because of the altitude? I am not really sure, but I put it in for 20 minutes, check and then do another 15. After it is light golden brown and has no soggy middle, pull it out of the oven and let it cool in the pan. When the pan is cool to the touch, I flip it over on a cooling rack and peel the parchment off to let it cool completely (another hour is good).
Ingredients for the topping:
1 orange
1 lemon (I haven’t always had a lemon, just oranges work fine)
1 cup water
1/2 cup sugar (For fall, I substituted some of the sugar with maple syrup near the end for flavor.)
1/4 cup Grand Marnier or other orange liqueur (I am a bourbon gal, so I usually only have bourbon in the house and that has worked fine every time for me.)
1/4 cup shelled pistachios toasted (chopped and whole for aesthetic appeal – Again, this is an opportunity to experiment with other flavors. For fall I used walnuts.)
1/4 cup pomegranate seeds (For fall, I substituted raisins.)
Slice the oranges and lemons and take out the seeds. Toss the citrus slices in a medium-sized saucepan with the water, sugar, and alcohol. Boil on high heat while stirring regularly. Lower the heat to a simmer and let the mixture get syrupy (this takes about an hour). Remove the big pieces of citrus and let the mixture cool a little bit. The recipe book says to pulse the mixture in a food processor and drizzle it onto the cake, and I bet that would be really awesome, but in the interest of time (and less to clean up), I have just drizzled the syrup onto the cake straight from the saucepan. Generously garnish with those beautiful pomegranate seeds and pistachios (or raisins and walnuts).
Voilá! It is done, and you have a delicious vegetarian, gluten-free cake that will serve as a stunning centerpiece on your dessert table!